In the world of video production, visuals hold the power to ignite emotions. Stories can impact us and move us deeply. But it is only possible if you use the correct tools to create and edit your videos. There are many tools you can use to enhance the look and feel of your videos. One such tool, which we will discuss today is color grading.
Whether you’re a filmmaker, video editor, content creator, or just someone looking to polish your visual content, understanding the basics of color grading can take your videos from good to unforgettable. Let’s start by understanding what color grading is and then we will move on to the tools.
What is Color Grading and Why It Matters?
Color grading is the process of enhancing and adjusting the colors in a video or image to create a specific mood, tone, or emotional response. This is the reason why certain visuals feel “right” and why some scenes stay with you long after they’re gone. It is how the scenes and the meaning behind them are built beyond the script. A scene might feel warm and nostalgic, or cold and tense or a video might feel bold and confident, or soft and comforting.
Behind every frame, colors are capable to stir certain emotions in the hearts of the viewers. A dark, blue-toned scene might convey sadness or tension, while golden hues can suggest warmth, romance, or nostalgia. With the right color grading, you control how your audience feels as they experience your content.
Even though color grading becomes almost invisible to us, if when done right, its impact is unmistakable. For creators, filmmakers, editors, or anyone working with visuals, understanding even the basics of color grading can be a game-changer. You can utilize color grading to set a vibe from the beginning of your video. It establishes atmosphere, enhances storytelling, and keeps visual consistency across different shots and scenes. This initial vibe/mood holds the potential to impact the overall experience of the viewers. And thanks to editing software like Adobe Premiere Pro, DaVinci Resolve, and Final Cut Pro, even beginners can start experimenting with color grading using presets and built-in tools.
There are more techniques, similar to color grading but are actually different. We will discover the difference between color grading and color correction to be clear on what we are talking about. Let’s explore the differences and learn about some tools for color grading.
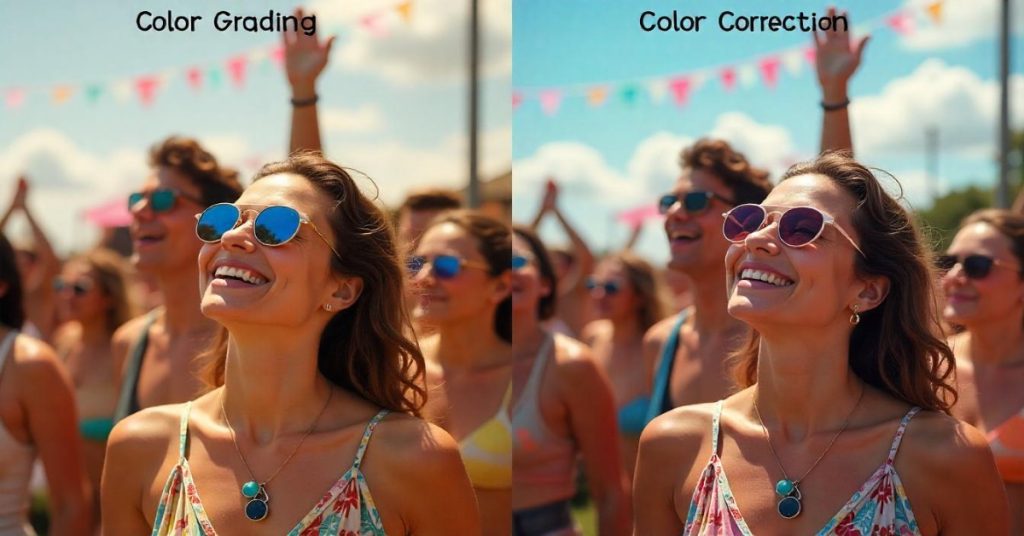
Color Correction vs. Color Grading: What’s the Difference?
The process of adjusting the footage to achieve a natural and balanced look by correcting exposure, white balance contrast and color temperature is called Color Correction. In simple terms, color correction makes your video look right with accurate skin tones and lighting.
Whereas Color Grading goes a step further. Once your footage is corrected, grading allows you to stylize your video. Want a gritty, dark thriller vibe? Or a light and airy travel vlog aesthetic? That’s where color grading comes in. It simply refers to adding stylistic color effects to enhance the visual storytelling and create a specific mood or atmosphere.
To simplify it in short:
- Color Correction = Fixing (technical adjustments)
- Color Grading = Feeling (stylistic choices)
Primary & Secondary Color Correction
There are 2 main types of color correction. By understanding the difference between the two, it can help you grade your videos more precisely.
Primary Correction refers to the global adjustments that affect the entire frame, like exposure, contrast, saturation and overall color balance. You can think of primary correction as your first pass, cleaning up the image so it’s visually consistent.
Whereas Secondary Correction refers to the targeted adjustments made at specific areas or colors within the image, allowing for more precise control. Want to brighten just the subject’s face, or change the hue of the sky without touching other elements? This is where secondary tools come in. It allows you to:
- Isolate specific colors or regions
- Mask certain parts of the image
- Refine skin tones or enhance background hues
Scopes and Tools for Color Grading
Color grading isn’t just about your eyes. You can’t rely just on your eyes while editing the colors of your videos. There are tools available that help analyze and adjust your footage accurately. Here are the most common ones:
1. Waveform Monitor
It helps you analyze the brightness (luminance) levels in your footage to ensure proper exposure across your frame.
2. Vector scope
It displays color information, particularly useful for balancing skin tones and ensuring color accuracy.
3. Histogram
A visual representation of the brightness distribution in your image, from shadows to highlights. It helps in adjusting exposure.
These scopes are especially helpful when your monitor isn’t perfectly calibrated. They offer objective data to guide your decisions. Make sure to learn how to use these tools properly to edit your videos more professionally. You don’t need to color grade your videos manually. Lucky you, there are pre-sets available for you to use and make your work easy. These presets are called LUTs (Look Up Tables), which we are going to discuss next. You can check them out and experiment with them as much as you can.
LUTs (Look-Up Tables)
They are predefined color grading presets that can be applied to your footage to achieve a specific look quickly. They are available on editing software, and you can use them to set the initial mood of the video. You should use LUTs since they are great for maintaining consistency across multiple shots.
These pre-defined color profiles can be applied with just one click. In easy words, you can think of them as filters but more advanced and accurate. LUTs are perfect for:
- Creating a consistent look across multiple clip
- Applying a signature aesthetic quickly
- Emulating cinematic color styles
You can find free LUTs online or purchase professional packs, depending on your desired effect. We will talk about LUT packs in the upcoming blogs. Stay tuned for that!
How to Start Color Grading as a Beginner
Since these things are new for beginners, they might feel overwhelmed, confused or hesitant to use them. Therefore, here are some practical tips, which you can implement, in case you’re just getting started.
- Start with Color Correction: You should always correct your footage first to get a balanced baseline.
- Use Presets or LUTs: Most editing software includes built-in presets, experiment with them!
- Stick to One Mood: Choose a consistent style or color palette for your project.
- Use Scopes for Accuracy: Rely on waveform, vector scope, and histogram for precise adjustments.
- Practice with Raw Footage: The more you experiment, the better you’ll understand how color impacts emotion and story.
Read More
How Can You Use VFX in Corporate Videos to Engage Viewers?

Music for Corporate Videos: How to Choose the Right One?

B-Roll: What is it & How to Use it Effectively in Videos?
Conclusion
Color grading is one of the most creative and impactful steps in video production. Even with a basic understanding, you can begin to transform your content and create more powerful visuals. Learning to manipulate color can elevate your skills and experience, giving your content a professional edge.
Ready to explore the world of color grading? Start small, practice often, and never stop learning! Thank you for reading our blog. We hope it was helpful. Stay tuned for more!